Saturday, May 31, 2014

3D Swap

I am also finally getting back into going to my swaps! My most recent one we had to make a bag, treat box or anything 3D!

Here are all the swaps! Didn't they turn out so cute?


Happy Crafting!

Thursday, May 29, 2014

Booth & Windows

Hello all! 

I am sure everyone has been missing my posts. It has been a crazy and busy year! With working full time I just haven't made the time to actually sit down and schedule out all my posts.

I have opened up my first booth and just signed the contract on a second booth so am making lots of cards, albums and windows. 

Here is my current booth at Junk Street in Katy:

I will be going to set up my new booth location soon which will be at Timeless Designs in Cypress! 
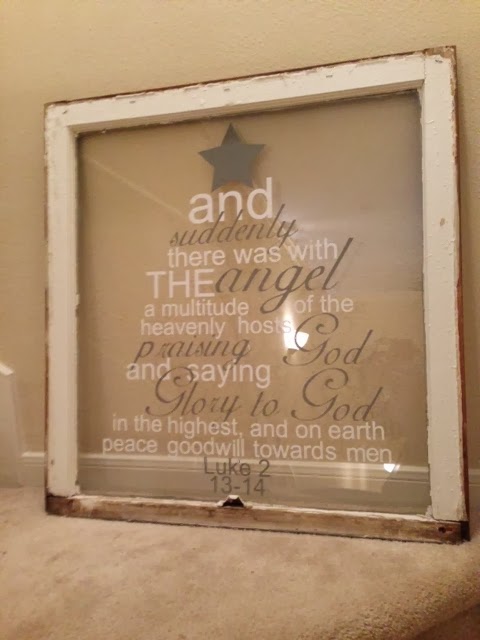
I was able to come across some old windows that had been painted and I am loving them :) I think they really make the saying pop!


Be looking for tomorrow's post! :)
Happy Crafting!

Tuesday, October 22, 2013

Save The Date & Rehearsal Dinner Invites

Evening all! Thanks for checking out my blog! Busy week already, just starting packing up some boxes. 
Move in day will be here sooner than we think!

Another Vinyl Window:


Here are a couple design samples I did for my best friend's wedding coming up in just a couple weeks, ah!
I can't wait to see these two get married!


Friday, October 18, 2013

Still going strong

Have still been crafting, just lost the time to post with my crazy life! Also have been crammed in a one bedroom apartment for the last few months while our house is being built. The good news is we will be moving in next month and I will have a craft room again, YAY! :)

I have gotten to do a booth or two lately which has been fun!

Here are some of the other projects I have been working on as well:
(Paper Scarecrow (Cut from SVGcuts.com), Christmas Tags & Vinyl Window)


Until next time, happy crafting all!


Thursday, March 7, 2013

French Country Mini Album

Evening all! 

Been a crazy week, we put our house on the market last Friday and have already sold it!
So much happening but I am so excited for what's to come.

Was cropping the other day and made a cute album out of the Graphic 45
French Country paper line. It is absolutely beautiful and I got this idea from their blog.
Though it's not quite finished here it is...


Until next time...

Thursday, February 28, 2013

Memory File Album

If you are looking for a project that holds lots of pictures, this is the one for you!

I had signed up to take this class but unfortunately wasn't able to make it. I did however get my kit and the directions! File Folders and paper are from the Heidi Swapp line and are absolutely beautiful.

I am not completely finished with it but wanted to show you all the start of it! This is such a neat concept and can be put into a little filing tote and displayed.

Memory File Album


Hope you enjoy!


Tuesday, February 26, 2013

I'm Back!

It has been so long since I have made a post and am excited to get back into the swing of things.

These 2 projects below are both inspired by Pinterest. Both of them came from the same wooden box which is so cool i thought! 

Photo / Recipe Holder Box


The paper line I used for this was Authentique which is just beautiful and can be found at Hobby Lobby. 
The box legs are designed by the lovely Tim Holtz.

Spring Shadow Frame


I learned a new technique when doing this. To apply the glitter around the edges of my paper I put a little bit of acrylic paint on a plate, rubbed my edges in it and dipped in glitter. The glitter does stick, such a fun way to adhere glitter! 

Thanks for following, have a blessed day!

Friday, November 2, 2012

Autumn Accents Candle

It has been way too long since I've done a blog post! The wedding was absolutely beautiful, all of us girls got to make out grand entrance on a yacht!
 
I absolutely love the Fall, in fact it's my favorite time of year. I wanted to make a thank you gift to all my fantastic volunteers that help me stuff Worship guides for the church.
 
When I saw this project, I had to do it! This was designed by Lynn from Craft Project Central.
I changed it up a bit as I didn't have a large pillar candle.


Now, I really had fun inking up all the leaves. I used the Stampin Up Very Vanilla card stock for the leaves and then the Early Espresso for the leaf backings.
 
Faux Fossil Technique:
To ink the leafs, get a page protector sheet ( any size will work) and cut 2 of the edges so that the only edge attached is the edge with the 3 holes. Now open it up and place one color on the right side and one color on the left. Close and rub together - it will mix the colors and form little air bubbles and such which will give the leave the awesome texture. And last, place your leaves in, close and rub hard to adhere all the ink to them. After you've inked all the leaves, take a dark brown ink and ink your edges.
 
Supplies:
Stampin Up Very Vanilla, Early Espresso & Cajun Craze Cardstock
Stampin Up More Mustard, Red Riding Hood & Early Espresso Ink
Stampin Up More Mustard Stitched Ribbon
Stampin Up Autumn Accents Die
Stampin Up Square Lattice Embossing Folder
Chipboard for base
Redliner Tape ( 1 inch) / Adhesive
 
 
Have a blessed day!

Wednesday, October 3, 2012

Christmas Card Class

 
Went to a lovely Christmas card class this past weekend! I'm really trying to get back in the swing of things.
 
Here are the cards, hope you enjoy!


Going to a crop this weekend and my plan is to work on wedding favors for my brother-in-laws wedding at the end of October. It is fast approaching!
 
Have a blessed day all!


Friday, September 28, 2012

Stationary

Got to go to another fabulous card class and this time we got to make our very own stationary set! They turned out beautiful!
 
You could use any color you'd like, but we used Stampin Up midnight muse as our main color. The blue ribbon you see is Stampin Up's new in-color ribbon and it is just stunning!


I also just had my first Scentsy Open house, which went incredibly well! As a thank you to my guests I ordered some warmer spatulas and gave one to each person.
 
Here's how I displayed these cute little things:


Hope ya'll enjoy! I will be headed to another card class tomorrow and can't wait to show ya'll what I made! :)


Wednesday, September 19, 2012

Halloween Card Swap

It seems like forever since I've done a card swap! Fun as always and such wonderful inspiration...
 
Here is the card I made for the swap using the Jack of All Trades stamp set by Stampin Up


And here are all the lovely cards from the swap:


Hope ya'll enjoy! :)


Wednesday, September 5, 2012

Kick Up Your Heels!

If they had a spot in the genius book of world records for worst blogger I think I'd be in the running! I just can't seem to stay on the ball when it comes to posting.
 
Have a cute and simple card for ya'll today. The stamp set I used comes from Stampin Up's Bootiful Occasions set, which is oh so cute!


Hope ya'll enjoy! Off to bed now... long day of work ahead of me. 


Monday, August 20, 2012

Vinyl Stencil

Thought I'd try my hand at making my own vinyl stencil!
It's a bit of work, but its so much FUN to do!

I made this with my lovely stencil!


And here's how I made it:

STEP ONE - Gather all your supplies! You want to make sure you have everything you need!
As you can see I'm missing my Scissors in the pic below and you DEFINITELY need them! :)

STEP TWO - Trace your image (With or pencil or erasable pen) by placing the printed image under the vinyl sheet

STEP THREE - Take your traced vinyl image and cut it out

STEP FOUR - Tape Vinyl Stencil to whatever you'd like to paint it on and
then paint whatever color(s) you'd like!

STEP FIVE - Let paint dry, then take off stencil

STEP SIX - Add the final touches. As you can see I had a few imperfections so I just hid them with a little bit of glitter! And it sure did make it stand out more!


Hope ya'll enjoy! I am truly trying my best to get some more blog posts for ya'll. Still
trying to adjust to this working full time business! I'm just so exhausted now when I
come home from work. Maybe a little cardio workout after work might help energize
me to get back into my craftroom!

Until next time, happy crafting all!

Saturday, August 11, 2012

Card Box

Afternoon all! I am in the process of getting my craft room back to normal so I can post more often!
For now, here's a card box and 2 cards I made in a card class a while back. Can't believe I forgot to show these to ya'll!

Hope ya'll ENJOY! :)


All product used is Stampin Up!


In other exciting news, I am officially a Scentsy consultant, crazy! :) Am so excited about this new venture. I will add a blog button which will be directed to my Scentsy site!

Until next time, happy crafting all!

Sunday, August 5, 2012

Postage Due

Am finally getting back to normal! Hopefully I'll be able to post more often now! :)
I've ordered some more wonderful things from Stampin Up and one of my new favorite stamp sets is Postage Due. If your into a little bit of vintage, this stamp set is right up your alley!

Here's a quick and simple card I made using this set:


Everything I used on this card is from Stampin Up! Hope ya'll enjoy!

Tuesday, July 31, 2012

Update

So I'm sure all of ya'll have been wondering what I've been up to? Its been nearly 2-3 weeks since I last posted, which is so sad.

I have just been a busy bee with my full time job! The hubby's been home so we've been traveling a bit and I can't believe it's almost time for him to head back out to the rig. Time sure does fly by!

And now when I'm about to get back into my craftroom, I come down with a summer cold that is kicking my butt! And the meds the doctor gave me make me so drowsy! So needless to say after I get home from work I pass plum out! I'm hoping and praying to be back to normal by the end of this week.

I will definitely have a post by the end of this week. Thanks to all those that continue to follow, ya'll are wonderful! :)

Friday, July 13, 2012

Earring Holder

Afternoon all! Hope everyone has had a wonderful week! Its been raining like crazy here in Texas, but its kind of a nice change from the hot weather! :)

So I was trying to figure out something new to create when I came accross this adorable earring holder and I had to give it a try. Got this idea from Amanda of kevinandamanda.com!

Here's what you need:


Now take the glass and backing off of the 8x10 frame:


Now, lets do a little painting! I just used white, but you can use any color you'd like!


Now, get your framing wires and staple to the back of the painted frame:


Almost done! Just place your new earring holder where you want it with all your fabulous earrings!


Such a FUN project to do! :)